Django Tutorial for beginners – part 1

Django is a Python framework that is used to build web applications at a fast pace. Django follows an MVT (Model View Template) based architecture, which encourages clean and maintainable code.
In today’s tutorial, we will set up a basic Django project with a virtual environment.
Prerequisites
- Python
- Pip
- Venv
Python
Getting started with Django would require prior Python installation.
Pip
Pip is used to install different packages in Python. It is included by default when Python is installed. You can check if you have pip by using this command:
pip –versionIn case it’s missing, you can install it separately from here:
https://pip.pypa.io/en/stable/installation/
Virtual Environment
Creating your project in a virtual environment is a good programming practice, this way you have separate dependencies installed for the project, which will not conflict with the root/system dependencies.
Therefore, we will create a virtual environment for this project using Python’s built-in ‘venv’ module.
Creating a Virtual Environment
1. Open your terminal.
2. Move to the location/directory where you want to open this project
3. Run this command to create a virtual environment.
python -m venv <env_name>4. Activate the virtual environment:
On macOS and Linux:
source <env_name>/bin/activateOn Windows:
<env_name>\Scripts\activateYou can see your virtual environment now which has been activated. If you named your virtual environment ‘venv’,
it will be like this
(venv) /path/to/your/project/$
Now that you have successfully set up your virtual environment for our project, let’s move on to the next section!
Installing Django
After making sure that Python and pip are installed, let’s go and install Django
pip install DjangoCreating Your First Django Project
Go to the directory where you want to open the project by using ‘cd’ or opening the terminal in that folder and enter the below command:
django-admin startproject <project_name>So, what’s django-admin?
Django-admin is a command line tool provided by Django, that helps you create and manage projects.
Understanding the Project Structure
myproject/
    manage.py
    myproject/
        __init__.py
        settings.py
        urls.py
        wsgi.py
Explanation about these files:
manage.py: This is a command-line utility for interacting with your project. You’ll use it to run development servers, create database tables, and perform various other tasks.
myproject/: This is the Python package for your project.
myproject/__init__.py: An empty file that tells Python that this directory should be considered as a Python package.
myproject/settings.py: This file contains the project’s settings.
myproject/urls.py: This is where the URL patterns for your project will be defined.
myproject/wsgi.py: WSGI means Web Server Gateway Interface. You’ll work with `wsgi.py` when deploying your project.
Creating Your First Django App
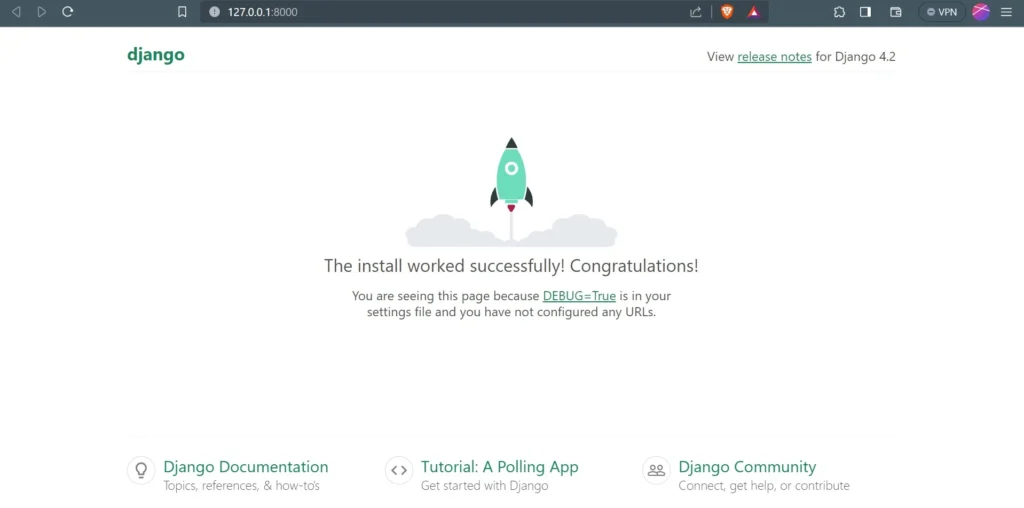
In order to run the project, use this command to get the server up and running:
python manage.py runserverGo to localhost i.e. 127.0.0.1:8000 and the below screen will appear as the default landing page:
So, let’s create an app:
Create an App
After setting up the project, the next main concept is of ‘app’. We create apps in Django as self-contained modules which help us organize our code. This is how scalability in Django is achieved.
To create a new app, go to your project’s root directory (where `manage.py` is located) in your terminal and run this command:
python manage.py startapp <app_name>For example, if there is a project for a restaurant management system. We can create apps like orders, staff, menus, etc.
It is highly recommended to make the app name meaningful.
For the app, You will see a structure like this:
myapp/
    __init__.py
    admin.py
    apps.py
    migrations/
        __init__.py
    models.py
    tests.py
    views.py
Here’s what each file and directory does:
myapp/__init__.py: This empty file indicates that `myapp` is a Python package.
myapp/admin.py: This file is used to define the admin interface for your app, allowing you to manage app-specific data from the Django admin site.
myapp/apps.py: Configuration settings for your app.
myapp/migrations/: In this file, keep track of database changes, any changes in database models are reflected here before actually making changes in the database.
myapp/models.py: Models.py is used to define all the database tables we have. Every app has its own models.py for its own models/tables.
myapp/tests.py: This is for writing tests for the code we write. (We’ll not use it in this tutorial)
myapp/views.py: This is the brain of our app. This is where all of the logic goes for handling user requests.
Add the app name in the installed apps dict in settings.py.
INSTALLED_APPS = [
    'django.contrib.admin',
    'django.contrib.auth',
    'django.contrib.contenttypes',
    'django.contrib.sessions',
    'django.contrib.messages',
    'django.contrib.staticfiles',
    '<app_name>',
]
For the next section, we will be creating a simple web page and introduce the concept of URL routing (which is the technical term or fancy name for redirection)
We will work on url routing in Part 2!
Talha is a seasoned Software Engineer with a passion for exploring the ever-evolving world of technology. With a strong foundation in Python and expertise in web development, web scraping, and machine learning, he loves to unravel the intricacies of the digital landscape. Talha loves to write content on this platform for sharing insights, tutorials, and updates on coding, development, and the latest tech trends


“Wow, this Django tutorial is fantastic! 🚀 It’s been such a helpful resource for me as I dive into web development with Python. The step-by-step explanations and clear code examples make it incredibly easy to follow along.